When the back end gets moved to the front things start getting interesting. One needn’t look too far into the London-borough-profiles workbook inlaid into the London Data Store site before you wind up shaking hands with the contributory data that primes the crisply-drawn map of the boroughs and their demographic traits in the Chart-Map sheet, as well as the ingredients batching the Profiles sheet into something comestible.
The data, featuring around 70 fields’ worth of borough-specific breakouts, are transparent to a fault, their formulas unpaved by hard-coded values and most available for the viewing and emending, and with their two hidden worksheets exposable at the touch of an Unhide command.
As a result, there’s a lot going on in this book. Start with Profiles, a collection of takes on a selected borough’s facts and figures, set into motion by a Data Validation drop-down selection menu (enabled by the List option) that reaps its list entries from the borough names fitted in the Data sheet’s column C (and range-named Boroughs). Click on the borough of Barnet for example and click again, this time on C7, and stare discreetly at this most curious formula:
=VLOOKUP(C$6,Data!$C:BW,lookup!$A1,FALSE)
The formula, meaning (and succeeding, after all) to convey Barnet’s population total, presses its lookup across three different sheets, and I think we need to ask if all that looking is necessary. The formula grabs the drop-down item in C6, which submits itself to a lookup table (or lookup array, in Excel-speak) awaiting in the Data sheet (and note the row-less C:BW reference, which in effect introduces every cell between those columns into the lookup array, and I’m not sure why that overreach was necessary). But it learns its column number – VLOOKUP’s third argument – from a cell A1 that’s been farmed out to yet a third sheet you need to Unhide, and entitled lookup (again, you can reveal the sheet without any obstruction).
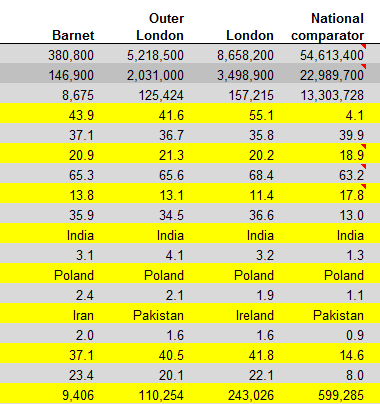
In excerpt, lookup’s column A starts out looking like this:
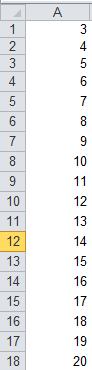
Then scroll down Barnet’s borough attributes in Profile’s C column and observe the VLOOKUP column number references stationed in their formulas, each upped by an increment of one from the previous formula one row up, and each receiving that value from the lookup’s A as above – a column that has no concerted role to play in the workbook apart from its 76 numbers, sorted highest to lowest.
Thus the VLOOKUPs in Profiles sight their column, or index, number in a vertically stacked tower of consecutive values that names the horizontal columnar position of the field in which the formula is interested. Barnet’s population of 380,000, then, emanates from the third column in the data!C:BW table array:
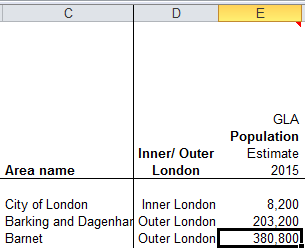
But our formula is ordering up that 3 not from data!C:BW – the actual data source – but from a improvised list of numbers quite external to the VLOOKUP fray, in the sheet called lookup.
It’s a rather inorganic and makeshift route to that 380,800, particularly when a known, standard means toward that end avails, something like this:
=VLOOKUP(C$6,Data!$C:BW,MATCH(Profiles!B7,Data!C1:BW1,0))
Here the VLOOKUP index number writes itself after having solicited the good offices of a neighbour in row 7, none other than GLA Population Estimate 2015 caption in B7 of the Profiles sheet. We can use MATCH to scout the position of that header in the selfsame Data!C:BW table array – or 3, where Barnet’s 380,800 awaits.
The point is that as a veritable matter of definition a lookup’s table array should be self-sufficient; that is, any VLOOKUP’s intent should be anticipated by the array, without any need to look elsewhere for the enabling data. The spire of values in lookup’s A3:A74 is an extra-table array artifice, whose placement suggests that the sheet designer didn’t quite know how to apply MATCH to the task.
Ok, so that’s not a federal offense, and of course the formulas in Profiles do work; but we need to call attention to the ultimately dispensable outside assistance furnished by that range in lookup’s A3:A74. There’s no need for it.
Now there’s at least one other remarkable feature of the Profiles sheet, this time of the formatting kind. I had advanced the guess to myself that the variously colored, merged header cells in the A column had been treated to some manner of conditional formatting, but it turns out they hadn’t been. By way of verification, tap F5 and click Special… on the resulting Go To dialog box and you’re admitted to its Go To Special box, wherein if you click Conditional formats:
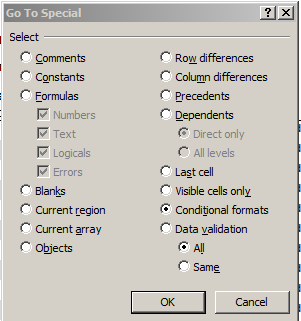
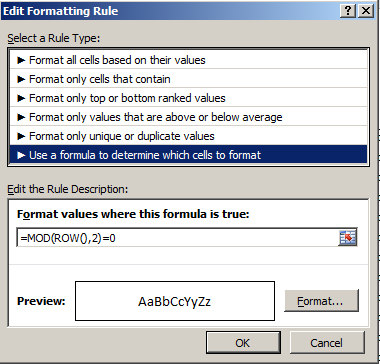
Click OK and all sheet cells subject to such any conditional format (by default) will be simultaneously highlighted for your visual inspection. And to my surprise, it was rather cells C7:G77 that had received the formats, one of which looks like this:

That formula tells us that any cell whose row number yields a remainder of 1 when it’s divided by 2 as per the MOD function should be formatted in the above gray. The other condition:
requires that any cell situated in a row number divisible by 2 without a remainder turn white. In short, the formats team to paint a row-banding effect across the impacted range, in fact a default feature of any data set that decides to turn itself into a table. But it doesn’t seem possible to have recast C7:G77 into table mode, because when I tried it I was told:

And C6 in the data set’s header row comprises a reference to D3, the cell in which the Borough-selection drop-down menu holds court. So the banding-format idea is a smart one.
But then I had a thought. It appears as if the conditional format that daubs even-numbered rows – the white cell fill color – looks an awful lot like Excel’s default cell format, which, after all, offers a black font color atop a white cell. So do we really need this conditional format?
With my lips pursed with that semi-rhetorical question I deleted that format – and saw
And I have no idea what that yellow’s doing there.
I told you there’s a lot going on in this workbook. I didn’t say I could explain it all.

Leave a comment